
Grammar Seat Parts Diagram helps identify and replace components in truck, tractor, bus, and construction vehicle seats. whether you’re working on a truck, tractor, bus, or construction vehicle, this guide helps you identify every major component and choose the correct replacement part with confidence.
The problem most drivers and fleet technicians face is straightforward: something breaks, they need to replace it, but they have no idea what that part is actually called or where it fits in the seat’s overall design.
This guide solves that problem. You will find a clear breakdown of every major component in a Grammer seat, what each part does, where it sits in the system, and how to identify the right replacement. No jargon walls, no guessing.
Why a Grammer Seat Parts Diagram Matters

Before you can order a replacement part, you need to know three things:
- What the part is called (its official Grammer part name or number)
- Where it lives in the seat (which zone or assembly it belongs to)
- Which seat model you have (not all parts are universal across Grammer’s lineup)
A proper parts diagram answers all three questions at once. It gives you a visual map of the seat broken into labeled zones, so you can point to a section and immediately know its name, function, and replacement reference.
Grammer’s Seat Model Families: Know Which One You Have
Grammer produces several distinct seat series. Parts are often model-specific, so identifying your series first saves time and money.
| Seat Series | Typical Application | Key Feature |
|---|---|---|
| MSG75AL | Light commercial vehicles, vans | Mechanical suspension, compact build |
| MSG85AL | Medium trucks, coaches | Air suspension, adjustable lumbar |
| MSG95AL | Heavy trucks, long-haul semi | Full air suspension, premium ergonomics |
| MSG97AL | Agricultural, construction machinery | High vibration damping |
| MAXIMO Dynamic | Long-haul trucks, luxury coaches | Advanced air suspension with horizontal dampening |
| ACTIMO XXL | Heavy trucks | Extended seat pan, full adjustment range |
| PRIMO | Buses, public transport | Durable upholstery, passenger-grade foam |
| KINGMAN | Forklift, industrial machines | Compact, low-profile design |
How to find your model number: Look underneath the seat base or on the backside of the seat frame. Grammer sticks a label there with the full model number, serial number, and production date.
Zone 1: The Seat Base and Cushion Assembly
This is the foundation of the seat, what you physically sit on.
Components in this zone:
- Seat pan: The rigid structural frame beneath the cushion. Usually steel or glass-fiber reinforced plastic.
- Seat cushion: Polyurethane foam molded to the seat pan shape. On heavy-use models, the foam density is higher to resist compression over time.
- Seat cushion cover: The outer fabric, vinyl, or leather layer. Available in different grades: standard fabric, PVC leather, or genuine leather depending on model.
- Cushion attachment clips: Small plastic or metal clips that hold the cover to the seat pan lip. These break more often than most technicians expect.
- Fore/aft slide rail assembly: Two steel rails that allow the seat to slide forward or backward. Includes the locking lever and toothed engagement mechanism.
- Fore/aft adjustment lever: Usually a bar running across the front or side of the seat base. Pulling it releases the lock so you can slide the seat.
Common failures here: Torn cushion covers, broken slide rail lock levers, and worn latch springs that stop holding the seat in position.
Zone 2: The Suspension System
The suspension system is the heart of any Grammer seat. It absorbs road and terrain vibration before it reaches the driver’s body, demonstrating the engineering excellence that defines the brand.
Grammer seats use one of two suspension types:
Mechanical Suspension (entry-level models)
- Scissor mechanism: Two crossed steel arms that compress and extend to absorb vertical movement. The pivot points use bushings that wear over time.
- Suspension spring: A coil spring that provides the restoring force. Spring rate is fixed on basic models.
- Weight adjustment knob: Lets the driver dial in their body weight so the suspension operates in its optimal range. Usually located on the right side of the seat base.
- Damper/shock absorber: A small hydraulic or gas-charged damper that smooths out the spring’s return motion.
- Upper and lower stop buffers: Rubber bumpers at the top and bottom of the suspension travel range. They prevent metal-to-metal contact at extreme compression or extension.
Air Suspension (mid to premium models)
- Air bellows/air spring: A rubber air bag that replaces the coil spring. It adjusts automatically or manually to match the driver’s weight.
- Air compressor: A small electric compressor (usually 12V or 24V) that supplies air to the bellows. Often located under the seat base.
- Air pressure control valve: Regulates the air flow in and out of the bellows. The ride height control button connects here.
- Solenoid valve: An electrically controlled valve that opens and closes to manage air flow in and out.
- Ride height indicator: A visual gauge or LED indicator that shows whether the seat is in its correct operating position.
- Air hose and fittings: The tubing that connects the compressor to the bellows. Cracks in these hoses are a common cause of slow suspension deflation.
- Horizontal dampener (MAXIMO/premium series): Absorbs fore/aft and lateral movement in addition to vertical bounce. A major differentiator on premium models.
Zone 3: The Seat Backrest Assembly
The backrest supports the spine and adjusts to match different driver postures.
Components in this zone:
- Backrest frame: The internal steel structure. On premium seats this is a one-piece welded frame. On budget versions it may be two-piece.
- Backrest foam: Contoured polyurethane foam, usually denser in the lumbar zone and softer in the upper back zone.
- Backrest cover: Matches the seat cushion cover material. It attaches via a zipper, hooks, or clips along the bottom edge and sides.
- Backrest angle adjustment: The mechanism that lets you recline or bring the backrest forward. Available in two types:
- Step adjustment: A lever locks the backrest at fixed increments (usually 5 or 6 positions).
- Continuous adjustment: A hand wheel or lever allows infinite adjustment within a range.
- Backrest adjustment lever or hand wheel: The external control the driver uses to change backrest angle.
- Tension spring (recline spring): Provides resistance when you lean back and returns the backrest toward upright when you release it. When this spring breaks, the backrest either flops back freely or locks up.
- Backrest pivot bolt and bushing: The hinge point where the backrest attaches to the seat base. Loose bushings cause the wobble that drivers describe as a “sloppy” backrest.
Zone 4: The Lumbar and Lateral Support System
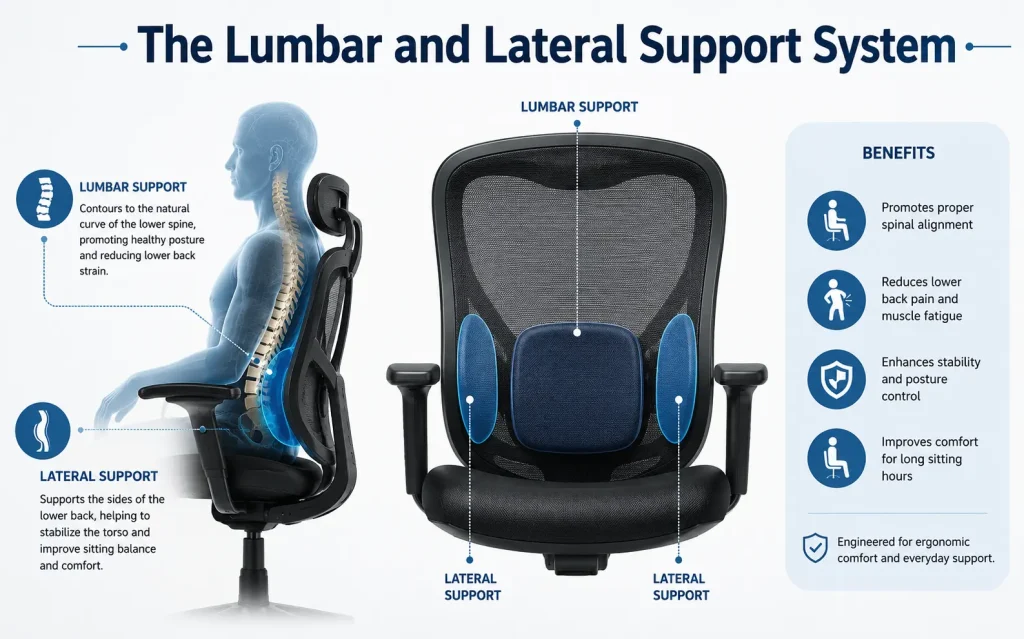
Many Grammer models include dedicated lumbar support systems. These are distinct from the backrest foam.
Components in this zone:
- Lumbar support bladder: An inflatable air bladder inside the lower backrest. Pressing the inflation button pushes the bladder outward, adding firmness and curvature to the lower back zone.
- Lumbar inflation pump: A small hand or electric pump that inflates the lumbar bladder.
- Lumbar release valve: Lets air out of the bladder so you can reduce lumbar pressure.
- Lateral support bolsters: Padded side wings on the backrest that keep the driver in position during turns. On some models these are adjustable.
- Lateral adjuster lever: Moves the bolsters in or out depending on the driver’s torso width.
- Heating element (heated seat models): A carbon fiber or wire element embedded in both the seat cushion and backrest. It connects to a relay and a rocker switch, usually mounted on the seat’s side panel.
- Heating relay: Protects the heating element from power surges. This small component fails more often than the element itself, often causing owners to replace the whole heating system unnecessarily.
Zone 5: The Armrests, Headrest, and Accessories
Armrests:
- Fixed armrests: Bolted directly to the backrest frame. Common on budget models.
- Folding armrests: Pivot up to allow easy entry and exit. The pivot hinge and locking pin are the parts most likely to wear.
- Height-adjustable armrests: Include a ratchet or button mechanism that lets the armrest move up or down. The ratchet mechanism is a common failure point.
- Armrest pad: The foam and cover on the top surface of the armrest. These can be replaced independently without changing the armrest frame.
- Armrest mounting bracket: The steel bracket that connects the armrest to the backrest frame.
Headrest:
- Headrest pad and cover: Foam cushion with a cover that matches the seat material.
- Headrest post: The two vertical steel rods that allow height adjustment.
- Headrest height lock: The button or latch that holds the headrest at the desired height.
- Headrest frame bracket: The part that clamps onto the top of the backrest frame.
Seat Belt Assembly (where fitted):
- Retractor mechanism: The spring-loaded spool that holds the belt in place and allows controlled extension.
- Belt webbing: The actual fabric strap.
- Buckle assembly: The receiver side of the belt.
- Mounting bolt and plate: Anchor points that attach the belt system to the seat or vehicle floor.
Grammer Part Numbering: How to Read It
Grammer uses a structured part numbering system. Understanding it helps you cross-reference parts accurately.
Format example: 741.500.000.0
- First three digits (741): Seat model family or product line code
- Middle three digits (500): Component category (e.g., 500-series often refers to suspension components)
- Next three digits (000): Specific part within the category
- Final digit (0): Variant or color code
When ordering, always provide:
- The full seat model number (e.g., MSG95AL/722)
- The serial number (found on the seat label)
- The part name and part number
- The production year if visible on the label
Parts That Wear Out Most Often (And What to Watch For)
Based on real-world wear patterns across Grammer’s commercial seat lineup, these are the components that fail first:
High-wear parts to stock or check regularly:
- Fore/aft rail lock springs. They weaken over time, causing the seat to creep forward during hard braking.
- Air suspension hose connections. Small cracks near the fittings cause gradual deflation. The seat sinks slowly during a shift.
- Seat cover seams. Especially at the front edge of the cushion and along the backrest side seams.
- Scissor mechanism bushings. Worn bushings create a lateral rocking that feels like a loose seat even when the mounting bolts are tight.
- Lumbar bladder seams. Air leaks slowly, losing lumbar pressure within an hour of inflation.
- Heating relay. Usually the first part to fail in heated seat systems.
- Backrest tension spring. When it snaps, the backrest has no return force.
- Cushion attachment clips. Cheap to replace but often overlooked until the cover starts bunching.
How to Identify a Part Without a Diagram
If you do not have the original diagram for your seat model, follow these steps:
- Take the seat out of the vehicle. Working on the seat while it’s mounted makes identification much harder.
- Photograph each zone separately. Top, bottom, left side, right side, and underneath.
- Find the seat label. It’s usually a white sticker on the underside of the seat base or the rear of the backrest frame. Write down every number on it.
- Contact a Grammer dealer with the label information. Grammer’s dealer network can pull up an exploded parts diagram specific to your serial number.
- Use Grammer’s online parts portal. Grammer and authorized distributors offer online parts lookup by model number.
- Describe the part by its location and function, not its appearance. “The lever on the right side that controls fore/aft movement” is more useful to a parts specialist than “a black plastic lever.”
Genuine vs. Aftermarket Grammer Parts: What You Need to Know

This is a topic competitors rarely address directly, but it matters for anyone maintaining a fleet or a single commercial vehicle.
Genuine Grammer parts:
- Guaranteed to match OEM tolerances and materials
- Covered by Grammer’s component warranty
- Correct fit without modification
- May cost more upfront but tend to last longer in high-use applications
Aftermarket parts:
- Often cheaper, especially for covers, foam, and basic hardware
- Quality varies significantly by supplier
- Some aftermarket suspension components do not meet the weight rating of the original
- For air suspension components (bellows, compressors, solenoids), OEM is strongly recommended because tolerance mismatches can cause rapid re-failure
Recommendation: Use genuine parts for suspension, safety-critical components (seat belts, mounting hardware), and air system components. Aftermarket is acceptable for covers, foam, armrest pads, and cosmetic parts where fit tolerances are more forgiving.
Installing Replacement Parts: General Tips
This guide is not a step-by-step installation manual (that varies by model), but these principles apply across Grammer seats:
- Always disconnect power before working on heated seat or air suspension components.
- Take photos before you disassemble anything. Grammer seats have several springs and clips that are easy to reinstall incorrectly.
- Torque mounting bolts to Grammer’s specification. Undertightened suspension pivot bolts are a safety risk.
- After installing a new air suspension component, test the full range of suspension travel before returning the seat to service.
- When replacing covers, warm the cover slightly before fitting if temperatures are low. Cold vinyl and fabric are much less flexible and tear more easily during installation.
- After replacing a fore/aft rail assembly, check the seat locks in all positions before the driver operates the vehicle.
Frequently Asked Questions
Where can I find the Grammer parts diagram for my specific seat model?
Contact your nearest authorized Grammer dealer with the model number and serial number from your seat label. You can also check Grammer’s official website or authorized distributor portals that offer exploded parts diagrams by model.
Can I use a parts diagram from a similar Grammer model?
Only with caution. Grammer frequently updates components within a model range, and part numbers can change between production years even for the same model. Always verify using your seat’s serial number.
My air suspension seat keeps sinking. Which part do I replace first?
Start with the air hose connections and fittings, as these fail more often than the bellows itself. Then check the solenoid valve. The compressor and bellows are less likely to be the first failure point.
What does the weight adjustment knob actually do?
On mechanical suspension seats, it pre-tensions the spring to match your body weight. Setting it correctly puts the suspension in the middle of its travel range when you’re seated, giving you the full range of up and down movement.
Are Grammer seats repairable, or do they need to be replaced when something breaks?
Grammer seats are designed for component-level repair. Almost every part shown in the diagram is available as a standalone replacement. Full seat replacement is rarely necessary unless the main frame or seat pan is structurally damaged.
Summary
A Grammer seat is not a single object. It is a system of five interconnected zones, each containing multiple serviceable components. Knowing your seat’s zone layout, the correct name for each part, and how to read a Grammer part number puts you in control of maintenance and repair.
The key takeaways:
- Identify your seat model and serial number before ordering anything
- Understand which zone the failed part belongs to
- Use genuine parts for suspension and safety components, aftermarket for cosmetic items
- The most common failures are in the suspension, cover, and lumbar systems
- Any authorized Grammer dealer can pull an exploded parts diagram specific to your serial number
A well-maintained Grammer seat lasts a long time. With the right diagram and the right part number, keeping it in that condition is straightforward.
You May Also Like It:
Camille Grammar’s Divorce Settlement